前几天说了,将HTTPS升级到了TLSv1.3,这么多天了,终于有时间整理下折腾过程了。
首先需要说明的是,这些过程我只是记录,不一定保证适合别的情况,我是根据我的实际需求添加了几个额外的模块,相对应的步骤也会不一样。
除了Nginx原有的模块之外,我还添加了如下几个模块:
– ngx_pagespeed
– ngx_http_google_filter_module
– ngx_http_substitutions_filter_module
– nginx_cache_purge
这几个模块分别用于不同的功能,有需要的可以到github搜索对应的repo进行了解。
在开始之前,需要说明的是,由于我们需要编译ngx_pagespeed,这个模块的编译对内存有一定的需要,我一开始是在Vultr的512MB内存的VPS上编译的,结果因为内存不足编译过程中报错退出,只好创建快照然后创建新的实例再继续编译,这里我推荐使用Vultr,可以随时创建、删除实例,还能升级降级,有全球10多个机房可选。
因为我是想在官方Nginx包的基础上添加新模块,并且打包成新的deb安装包部署到别的服务器,所以,绝大部分文件都是利用系统自带或者Nginx官方开放的。
我这里选的是Debian9,其实Debian8系统也差不多。创建VPS及安装系统SSH登录什么的就不说了,直接说相关的步骤。编译打包期间源码存放路径是/usr/local/src/。
首先,添加Nginx官方的源,参考这里:Pre-Built Packages for Stable version。
然后是安装编译相关所需要的依赖:
apt install build-essential ca-certificates zlib1g-dev libpcre3 libpcre3-dev tar unzip libssl-dev wget curl git
下载Nginx源代码及相关打包需要的文件:
cd ~
mkdir -p ~/new/nginx_rebulid/ #创建新目录  用于保存我们所要使用的文件
cd ~/new/nginx_rebulid/
apt-get source nginx #下载Nginx源代码
apt-get build-dep nginx  #安装编译Nginx所需要的依赖
然后是准备我们所需要的模块。
下载使用新的OpenSSL版本
要支持TLS 1.3,我们需要使用新一点的OpenSSL版本,系统自带的肯定是不用考虑了,下载使用新的OpenSSL:
cd /usr/local/src/
wget https://www.openssl.org/source/openssl-1.1.1-pre8.tar.gz
tar zxvf openssl-1.1.1-pre8.tar.gz
openssl-1.1.1-pre8 openssl
在OpenSSL官网能找到最新的版本:https://www.openssl.org/source/
这么直接使用也可以,但是为了兼容以前的TLS 1.3草案,我还是给OpenSSL打了个补丁,参考的是这篇文章。
下载并patch刚下载的OpenSSL:
cd /usr/local/src/
git clone https://github.com/hakasenyang/openssl-patch
cd /usr/local/src/openssl
patch -p1 < /usr/local/src/openssl-patch/openssl-equal-pre9_ciphers.patch
ngx_pagespeed模块
最新的ngx-pagespeed版本可以在这里找到,我目前用的是1.13.35.2,下面是这个模块的操作步骤:
cd /usr/local/src/
wget https://github.com/apache/incubator-pagespeed-ngx/archive/latest-stable.zip
unzip latest-stable.zip
cd incubator-pagespeed-ngx-latest-stable/
NPS_VER=1.13.35.2
psol_url=https://dl.google.com/dl/page-speed/psol/${NPS_VERSION}.tar.gz
[ -e scripts/format_binary_url.sh ] && psol_url=$(scripts/format_binary_url.sh PSOL_BINARY_URL)
wget ${psol_url}
tar -xzvf $(basename ${psol_url})
ngx_http_google_filter_module和ngx_http_substitutions_filter_module
然后是另外两个模块:
cd /usr/local/src/
git clone https://github.com/cuber/ngx_http_google_filter_module
git clone https://github.com/yaoweibin/ngx_http_substitutions_filter_module
修改Nginx打包配置文件
准备好模块之后,我们就要开始更改我们的Nginx打包配置了。
cd ~/new/nginx_rebulid/nginx-{nginx版本号}/debin/
vim rules
其实我们要改的就两个部分:
config.status.nginx: config.env.nginx
    ...

config.status.nginx_debug: config.env.nginx_debug
    ...
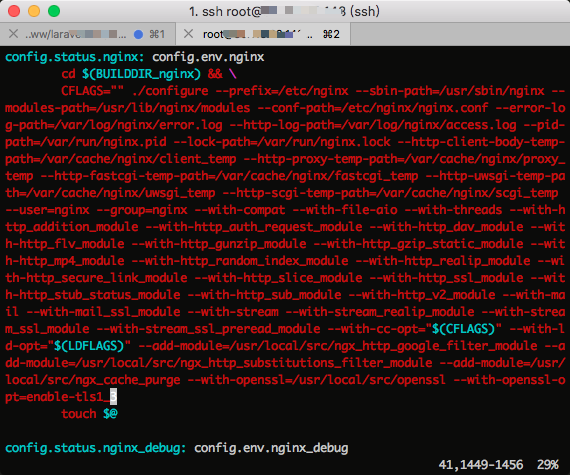
现有的可以不动,直接在后面添加我们所需要的选项就行,如果你的需求和我的一样,只需要在上面两个部分末尾添加如下几个编译项就行:
--add-module=/usr/local/src/ngx_http_google_filter_module --add-module=/usr/local/src/ngx_http_substitutions_filter_module --add-module=/usr/local/src/ngx_cache_purge --with-openssl=/usr/local/src/openssl --with-openssl-opt=enable-tls1_3
如图:
接下来就是编译并重新打包了。
重新编译Nginx并打包成deb
直接执行如下命令就行:
cd ~/new/nginx_rebulid/nginx-{nginx版本号}/
dpkg-buildpackage -b
编译过程十有八九会报错,原因可以看这里:https://www.starduster.me/2018/06/08/build-nginx-1-15-with-tls13/
如果一切顺利的话,会在~/new/nginx_rebulid目录生成对应的.deb安装包,生成的.deb安装包,可以直接安装也可以传输到别的相同系统相同架构的服务器安装,安装也很简单,一行命令搞定:
dpkg -i nginx_1.14.0-1~stretch_amd64.deb
安装之后,查看我们刚才配置的编译选项:
nginx -V

configure arguments: --prefix=/etc/nginx --sbin-path=/usr/sbin/nginx --modules-path=/usr/lib/nginx/modules --conf-path=/etc/nginx/nginx.conf --error-log-path=/var/log/nginx/error.log --http-log-path=/var/log/nginx/access.log --pid-path=/var/run/nginx.pid --lock-path=/var/run/nginx.lock --http-client-body-temp-path=/var/cache/nginx/client_temp --http-proxy-temp-path=/var/cache/nginx/proxy_temp --http-fastcgi-temp-path=/var/cache/nginx/fastcgi_temp --http-uwsgi-temp-path=/var/cache/nginx/uwsgi_temp --http-scgi-temp-path=/var/cache/nginx/scgi_temp --user=nginx --group=nginx --with-compat --with-file-aio --with-threads --with-http_addition_module --with-http_auth_request_module --with-http_dav_module --with-http_flv_module --with-http_gunzip_module --with-http_gzip_static_module --with-http_mp4_module --with-http_random_index_module --with-http_realip_module --with-http_secure_link_module --with-http_slice_module --with-http_ssl_module --with-http_stub_status_module --with-http_sub_module --with-http_v2_module --with-mail --with-mail_ssl_module --with-stream --with-stream_realip_module --with-stream_ssl_module --with-stream_ssl_preread_module --with-cc-opt='-g -O2 -fdebug-prefix-map=/root/new/nginx_rebulid/nginx-1.14.0=. -specs=/usr/share/dpkg/no-pie-compile.specs -fstack-protector-strong -Wformat -Werror=format-security -Wp,-D_FORTIFY_SOURCE=2 -fPIC -Wno-error' --with-ld-opt='-specs=/usr/share/dpkg/no-pie-link.specs -Wl,-z,relro -Wl,-z,now -Wl,--as-needed -pie' --add-module=/usr/local/src/ngx_http_google_filter_module --add-module=/usr/local/src/ngx_http_substitutions_filter_module --add-module=/usr/local/src/ngx_cache_purge --with-openssl=/usr/local/src/openssl --with-openssl-opt=enable-tls1_3
看最后几行,说明成功加入了我们所需要的模块,下一步就是配置Nginx了。